>>> DOWNLOAD FAB v0.9 <<<
1. Command line?
fab is a command line tool to create and manipulate images. This
means there is no graphical user interface (gui) and you must execute the
fab program with parameters so that it will perform operations on
the image files. To give commands and parameters to the program, the first
method is to open a command line interpreter (command prompt on m$do$,
cli on RiscOS, shell on Unixes...) and write your orders
one after another. For example on m$do$:
 (niko_heart.bmp)
  C:\baah\c\fab>fab bmp2rgb niko_heart.bmp red.g green.g blue.g
  bmp2rgb: 32 x 32 OK
  C:\baah\c\fab>fab rgb2bmp green.g blue.g red.g niko_heart_blue.bmp
  rgb2bmp: 32 x 32, 11 colors OK
 (niko_heart_blue.bmp)
The second method is to make a file with the different commands and ask
the system to execute them (batch file on m$do$, obey file on
RiscOS, shell file on Unixes...). For the example above, again of
m$do$, you create a text file called "example.txt", write the following
orders in it:
  fab bmp2rgb niko_heart.bmp red.g green.g blue.g
  fab rgb2bmp green.g blue.g red.g niko_heart_blue.bmp
  del *.g
Then you rename it to "example.bat" and execute it by typing
C:\baah\c\fab>example under m$do$ or by double clicking
on it under m$window$ (the last one will not allow to see errors).
2. File formats
fab uses the following fileformats:
- The classical .bmp bitmap format from m$window$ is widely known
and simple enough to exist in almost every graphic program. It can
support images up to 16,777,216 colours (24 bits per pixel). There are
only a few functions dealing with .bmp files, because fab
only performs graphical operation on .g files.
- The .g files are containing only one channel of an image: red or
green or blue values, or grey values or... Sometimes you'll need to
perform operations three times, one for each channel. A .g file
contains two unsigned 16 bits numbers for width and height of an image, then
width*height values for the channel, each one being an unsigned 16 bits number.
So theoretically we can go up to 281,474,976,710,656 colours (48 bits
per pixel).
- The .pal files are containing colour palettes. They are made
of triplets of bytes, one for every colour. There's only one operation
using this.
- A palette can also be given as a .txt file, which shall contain
the palette in hexadecimal format, 6 chars per palette entry (so 0 shall
be coded as 00). Chars not in the [0;9]+[A;F] range are ignored. Also,
if a line contains a semicolon, the rest of the line is treated as a comment.
- It's also possible to save an image in an Atari ST like bitplane format.
3. List of commands
Commands and parameters are shown in bold. Comments are in normal text.
Functions that might be added in the future are shown between interrogation marks.
3.1. File conversion
- fab bmp2rgb in.bmp red.g green.g blue.g
- fab rgb2bmp red.g green.g blue.g out.bmp
- fab bmp2grey in.bmp grey.g // grey=(red+green+blue)/3
- fab grey2bmp grey.g out.bmp
- fab rgb2grey red.g green.g blue.g grey.g // grey=(red+green+blue)/3
- fab bmp2textpalette in.bmp out.txt out.g //save text palette and raw image from a 2;4 or 8 bpp .bmp image
- fab palette2rgb in.pal in.g red.g green.g blue.g
// Assigns pixels according to a color palette file
- fab textpalette2rgb in.txt in.g red.g green.g blue.g
// Same as above, but color palette is given in hexadecimal text
- fab grey2bitplanes nbbitplanes in.g out.xxx
// Save a grey image in the Atari ST bitplanes mixed format
(was used for mkstrippedtube in the old directory)
???fab getmask with .bmp and color as source???
???fab rgb2bitplanes ???
3.2. Drawing primitives
The bottom left corner has coordinates (0;0).
- fab mknoise colormin colormax width height out.g
// Creates an image filled with noise. I often use it to create an empty image (colormin=colormax=0).
- fab disc xcenter ycenter radius color in.g out.g
- fab rectangle xleft ybottom xright ytop color in.g out.g
- fab rectangle2 xleft ybottom width height color in.g out.g
- fab hgradientfill colortochange leftcolor rightcolor in.g out.g // Change all pixels with color "colortochange" into an horizontal gradient
- fab vgradientfill colortochange downcolor upcolor in.g out.g // Change all pixels with color "colortochange" into a vertical gradient
- fab circulargradientfill xcenter ycenter centercolor outercolor in.g out.g // Change all pixels with same color as (xcenter;ycenter) into a circular gradient
- fab sphericalgradientfill xcenter ycenter centercolor outercolor in.g out.g // Change all pixels with same color as (xcenter;ycenter) into a spherical gradient
???fab getzoneofsamecolor???
???fab magicwand???
// Same as getzoneofsamecolor but with threshold
3.3. Standard image manipulation
- fab negative in.g out.g // BEWARE, pixel=65535-pixel, maybe rsbI 255 is what you want.
- fab rotate90 in.g out.g // All rotations are clockwise.
- fab rotate180 in.g out.g
- fab rotate270 in.g out.g
- fab hmirror in.g out.g // Image upside down.
- fab vmirror in.g out.g
- fab gluehorizontally in1.g in2.g out.g // The height is set to minimum of both.
li>fab gluevertically in1.g in2.g out.g // The width is set to minimum of both. First named picture is on the bottom.
- fab setcommonwidth color in1.g in2.g // File with smaller width is centered and extended to bigger width. First named picture is on the left.
- fab setcommonheight color in1.g in2.g // File with smaller height is centered and extended to bigger height.
- fab addborders left right up down color in.g out.g
- fab addsimilarborders size in.g out.g // Copy the outer lines size times around the image (eg to avoid wrapping)
- fab addborderstomultipleof xmod ymod color in.g out.g
- fab removeborders left right up down in.g out.g
- fab autosetborders width in.g out.g
// Check if a border colors exists (there must be at least one border with a
unique color, and all borders with unique color share the same one) then
modifies the image so that all borders have the same width (possibly 0).
???fab skew???
???fab autosetborders with .bmp and color as source ???
???fab copyborderstomultipleof???
3.4. Arithmetic and logic functions
When two images with different width and/or height are given as source,
the resulting image has minimum width and/or height.
- fab add in1.g in2.g out.g
- fab sub in1.g in2.g out.g // out.g = in1.g - in2.g
- fab mul in1.g in2.g out.g
- fab div in1.g in2.g out.g // out.g = in1.g / in2.g
- fab and in1.g in2.g out.g
- fab or in1.g in2.g out.g
- fab xor in1.g in2.g out.g
- fab addI value in.g out.g // Same as above but with an Immediate value
- fab subI in.g value out.g
- fab rsbI value in.g out.g // rsb means reverse substract
- fab mulI factor in.g out.g
- fab divI in.g divisor out.g
- fab rdvI dividend in.g out.g //rdv means reverse divide
- fab andI value in.g out.g
- fab orI value in.g out.g
- fab xorI value in.g out.g
???fab modulo in1.g in2.g out.g???
???fab moduloI in.g divisor out.g???
???fab rmoduloI dividend in.g out.g???
Arithmetic and logic functions can be used for many purposes.
One of them is putting an image above another, as explained below:

step 1: background image (blurred random noise on R/G/B channels)
step 2: sprite (ie image to put above the other one)
step 3: mask for sprite (pixels in sprite set to 0, others set to 255)
step 4: background AND mask
step 5: (background AND mask) OR sprite
You can also have smoother edges for the sprite if its mask contains more
than on/off information. Below the mask has been blurred (using a convolution filter,
but we could also use the distance function).
The sprite is modified with "(sprite MUL NOT mask) DIV 255", and we also replace step 4 above
by "(background MUL mask) DIV 255".

3.5. Sampling et scaling functions
- fab sampleup_miller nbiterations in.g out.g // size will be multiplied by 2^nbiterations
Each iteration goes like this: for every pixel h(x;y) you take h00=h(x+0;y+0); h01=h(x+0;y+1); h10=h(x+1,y+0);
h11=h(x+1;y+1) and you create 4 points:
h(x+0.25;y+0.25)=0.75*0.75*h00+0.75*0.25*h01+0.25*0.75*h10+0.25*0.25*h11
h(x+0.75;y+0.25)=0.25*0.75*h00+0.25*0.25*h01+0.75*0.75*h10+0.75*0.25*h11
h(x+0.25;y+0.75)=0.75*0.25*h00+0.75*0.75*h01+0.25*0.25*h10+0.25*0.75*h11
h(x+0.75;y+0.75)=0.25*0.25*h00+0.25*0.75*h01+0.75*0.25*h10+0.75*0.75*h11
The old pixels are forgotten. The computations are in fact very easy since
0.75*0.75=9/16, 0.75*0.25=3/16 and 0.25*0.25=1/16.
- fab sampledown xratio yratio in.g out.g // xratio and yratio must be integers
- fab scaleup xratio yratio in.g out.g
- fab scaledown xratio yratio in.g out.g
- fab epx in.g out.g // Doubles the size using Eric Johnston's
pixel expansion algorithm (LucasArts, 1992, AdvMAME2x version).
- fab advmame3x in.g out.g // Triples the size using a similar pixel expansion algorithm (AdvMAME3x)
???fab hq2x???
???fab hq3x???
???fab rescale [w=... | h=... | x...] in.g out.g???
???fab resample [w=... | h=... | x...] in.g out.g (bilinear/biquadratic/bicubic... resampling)???
3.6. Standard color manipulation
- fab setmincolor newmincolor in.g out.g // Substract oldmincolor-newmincolor to every pixel.
- fab setmaxcolor newmaxcolor in.g out.g // Substract oldmaxcolor-newmaxcolor to every pixel.
- fab allcolorsabove mincolor in.g out.g // If color<mincolor then color=mincolor.
- fab allcolorsbelow maxcolor in.g out.g // If color>maxcolor then color=maxcolor.
- fab allcolorsbetween mincolor maxcolor in.g out.g // If color<mincolor then color=mincolor, etc...
- fab range mincolor maxcolor in.g out.g // = equalise???
- fab minimum in1.g in2.g out.g // For every pixel out=minimum(in1;in2) (same as darkest?).
- fab maximum in1.g in2.g out.g // For every pixel out=maximum(in1;in2) (same as lightest?).
???fab couleur_majoritaire???
???color remapping function (usefull for ST bitplanes)???
3.7. Color dithering
The output of all this functions will be a grey image with intensity in [0;nb_colors-1].
You'll often use the range function afterward to put the intensity back in
[0;255]. Also note that you must use the range function to make
nearest neighbourgs dithering.

The image shows a texture (fractal landscape with modulo) with colors reduced
using nearest neighbourgs as method 0, then the dithering as numbered below:
- fab randomdithering nb_colors in.g out.g
- fab ordered2x1 nb_colors in.g out.g // Vertical lines.
- fab ordered1x2 nb_colors in.g out.g // Horizontal lines.
- fab ordered2x2 nb_colors in.g out.g // (Also called Bayer algorithm???)
- fab ordered3x3 nb_colors in.g out.g
- fab ordered4x4 nb_colors in.g out.g
- fab ordered4x4bis nb_colors in.g out.g // Diagonals.
- fab floydsteinberg nb_colors in.g out.g // Reduce colors using Floyd-Steinberg algorithm, which propagates the error made
on current pixel to the next ones with following coefficients:
    . 7   and divide by 16
  3 5 1
- fab stucki nb_colors in.g out.g // Another error diffusion algorithm, which is
said to have a clean and sharp output. The idea is similar to Floyd-Steinberg
but with the following coefficients:
      . 8 4
  2 4 8 4 2  and divide by 42
  1 2 4 2 1
???fab ordereddithering + page flip => 5+4=9 grey levels???
???fab floyd palette.pal red.g green.g blue.g out.g // <65536 colors???
* There are many ways to find the nearest palette color with varying levels of efficiency
and quality. A trivial algorithm is to search the color with minimum straight line
distance in the color cube from the given color.
* We can alternate between left-to-right and right-to-left (also reflect the diffusion
matrix), this avoids some kind of artifacts.
3.8. Convolution filter
Only one function in here, but it's an important one
since it can be used for a lot of effects. The filter is wrapping,
ie for pixels with x=0 we also take in account the pixels with x=width-1,
same for y... To avoid wrapping, use addsimilarborders + removeborders.
Some usefull filters:
fab filter 0 1 0 1 1 1 0 1 0 5 0 in.g out.g // smooth1
fab filter 1 2 1 2 4 2 1 2 1 16 0 in.g out.g // smooth2
fab filter -1 1 -1 1 1 1 -1 1 -1 1 0 in.g out.g // unsmooth
fab filter -2 -1 0 -1 0 1 0 1 2 1 128 in.g out.g // relief1
fab filter -1 1 -1 1 0 1 -1 1 -1 1 128 in.g out.g // relief2
fab filter 0 -1 0 -1 2 0 0 0 0 1 128 in.g out.g // relief3
fab filter 1 0 1 0 -1 0 1 0 1 3 0 in.g out.g // strange1
fab filter 0 1 0 1 -1 1 0 1 0 3 0 in.g out.g // strange2
fab filter 0 -n 0 -n 4n+1 -n 0 -n 0 1 0 in.g out.g // sharpness
fab filter -n -n -n -n 8n+1 -n -n -n -n 1 0 in.g out.g // sharpness2
fab filter -1 -1 -1 -1 8 -1 -1 -1 -1 1 0 in.g out.g // edge=laplace
fab filter 0 -1 0 -1 4 -1 0 -1 0 1 0 in.g out.g // laplace2
fab filter -1 -1 -1 0 0 0 1 1 1 1 0 in.g out.g // edge2
fab filter -5 0 0 0 0 0 0 0 5 1 0 in.g out.g // edge3
fab filter 0 0 0 0 -1 0 0 0 1 1 0 in.g out.g // emboss
fab filter 2 0 0 0 -1 0 0 0 -1 1 0 in.g out.g // emboss2
fab filter -2 -1 0 -1 1 1 0 1 2 1 0 in.g out.g // repoussage
3.9. Misc functions
fab allows for easy implementation of graphical routines. The ones below are
less classical than previous ones, but might be of interest.
- fab fillwithOs OutRMin OutRMax InRMmin InRMmax Border ClearColor CircleColor in.g out.g
// Fills the area of color 0 with random circles.
If you set ClearColor to 0, then you can have circles inside circles.
Border is the gap between neighbouring circles, i usually set it to 0.
- fab edge size emptycolor edgecolor in.g out.g
// Creates an edge of given size around non empty pixels.
- fab squareedge size emptycolor edgecolor in.g out.g
// This time the edge uses the strange but easier square distance.
- fab distance size emptycolor startcolor endcolor in.g out.g
// Creates a linear halo of given size around nonempty pixels.
- fab voronoi emptycolor in.g out.g // Uses all non-empty points of in.g
(at most 10000) to create a Voronoi diagram. All the Voronoi cells will have a
unique color between 0 and number of non-empty points-1.
- fab explode nbpoints in.g out.g// Randomly exchanges nbpoints couples of pixels.
- fab landscape nbiterations in.g out.g
// Fractal landscape, used for many textures.
Width and height will be multiplied by 2^nbiterations.
- fab tiling tiles.txt in.g out.g// Takes a textfile containing square
tiles encoded with figures 0 to 9s and an image with less than 10 colors, then
redraws the image with the tiles only. Number of 0-9 figures in first line
will be taken as squares' size.
- fab star x y nbspikes startangle radius1 power1 radius2 power2 color in.g out.g
// Draws a star with rounded spikes. Startangle in [0;359].
Powers are multiplied by 100 and low values give a spike while big ones give a square.
- fab discify radius in.g out.g
// Converts a [0;255] greyscale image into a monochromatic image of size multiplied
by 2r+1 where pixels are converted to discs of varying sizes.
- fab rndcell width height p1 p2 p3 out.g
// Creates a width*height grey file filled with 0s and 1s according to a random cellular automaton.
Probabilities p1;p2;p3 in [0;100]. See rndcell_JS.htm and
rndcellTransitions_JS.htm
for examples and explanations.
- fab rndcellt width height p1b p2b p3b p1t p2t p3t out.g // Random cellular automaton with transition between bottom and top values.
- fab taglia width height radius edge iterations out.g // Create a b&w taglia picture, adapted from Jan Vibe.
- fab countnonzeropixels in.g // Outputs number of non zero pixels as text (debugging/stats purposes).
???fab rgbLpixel???
???fab ntsc (Fred): a kind of sampleup_miller with randomness???
???fab squareborder=squareedge???
4. Some examples
To make a shadow, we get two shifted copies of the same image,
we enlighten (or darken) the shadow with range, blur it with filter and then put the original
image above:
  fab bmp2grey fab_1bpp.bmp shape.g
  fab rsbI 255 shape.g shape.g
  rem Now the logo is set to 0, outside to 255
  fab addborders 10 0 10 0 255 shape.g shadow.g
  fab range 160 255 shadow.g shadow.g
  fab filter 1 2 1 2 4 2 1 2 1 16 0 shadow.g shadow.g
  fab filter 1 2 1 2 4 2 1 2 1 16 0 shadow.g shadow.g
  fab addborders 0 10 0 10 255 shape.g shape.g
  fab and shape.g shadow.g shape.g
  rem Since shape.g contains only 0 and 255 values,
  rem a simple "and" had the same effect as  masking
  fab sampledown 2 2 shape.g shape.g
  fab grey2bmp shape.g TutorialShadow.bmp
  del *.g
|
|
 |
Many textures are in the more_examples folder, i'll just speak about Txtr2D.
Quite simply we create a random 4x4 image, expand it with the fractal landscape
function, blur it, take the values modulo 32 (with the andI function)
and use a cycling color palette with 32 entries.
I advise you to launch the batch files for other textures in the more_examples
folder. Some modifications have been obtained just by changing the color palette!
 |
|
  fab mknoise 0 200 4 4 grey.g
  fab landscape 6 grey.g grey.g
  fab filter 1 2 1 2 4 2 1 2 1 16 0 grey.g grey.g
  fab andI 31 grey.g grey.g
  fab textpalette2rgb pal_Txtr2D.txt grey.g red.g green.g blue.g
  fab rgb2bmp red.g green.g blue.g Txtr2D.bmp
  del *.g
|
The fillwithOs function is very slow, but interesting in my humble opinion.
Here we had to increase the size of the fab logo using the edge function,
and enlarge the image since fillwithOs requires big monochrome images.
  fab bmp2grey fab_1bpp.bmp shape.g
  fab addborders 10 10 10 10 0 shape.g shape.g
  fab edge 9 0 255 shape.g shape.g
  fab scaleup 3 3 shape.g shape.g
  fab rsbI 255 shape.g logo.g
  rem Now the logo is set to 0, outside to 255
  fab fillwithOs 10 25 5 15 0 0 255 logo.g logo.g
  fab and shape.g logo.g logo.g
  fab sampledown 6 6 logo.g logo.g
  fab rsbI 255 logo.g logo.g
  fab grey2bmp logo.g TutorialFillWithCircles.bmp
  del *.g
|
|
 |
Now for a more complex example. The picture by BriteLite was created
for a contest with the constraint of using 4 colors only. I have always
loved the special dithering in it, and wanted to make something similar.
The background is similar to Txtr2D but converted to 2 colors with
ordered4x4 dithering. The logo is reduced with sampledown,
the mask is created with an edge, then both are expanded with scaleup,
the logo is converted to 4 colors with ordered2x2 dithering.
Last, using the mask, the background and logo are mixed.
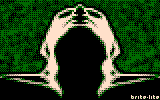
BriteLite-Pain
remixed with fab

|
|
  rem background
  fab mknoise 0 255 4 4 background.g
  fab landscape 8 background.g background.g
  fab filter 1 2 1 2 4 2 1 2 1 16 0 background.g background.g
  fab andI 31 background.g background.g
  fab ordered4x4 2 background.g background.g

  rem start shape (expand size to multiples of 8)
  fab bmp2grey fab_1bpp.bmp shape.g
  fab addborders 129 129 51 51 0 shape.g shape.g
  fab sampledown 8 8 shape.g shape.g

  rem mask for the shape
  fab edge 2 0 255 shape.g mask.g
  fab allcolorsbelow 1 mask.g mask.g
  fab mulI 255 mask.g mask.g
  fab rsbI 255 mask.g mask.g
  fab scaleup 2 2 mask.g mask.g

  rem continue shape (we can put details in it)
  fab scaleup 2 2 shape.g shape.g
  fab ordered2x2 4 shape.g shape.g

  rem mix background, mask and shape
  fab and mask.g background.g background.g
  fab or background.g shape.g shape.g
  fab textpalette2rgb pal_britelite.txt shape.g red.g green.g blue.g
  fab rgb2bmp red.g green.g blue.g TutorialBriteLite.bmp
  del *.g
|
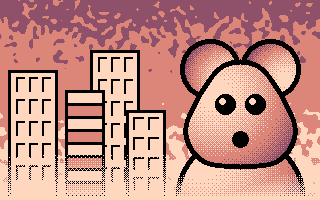
Another one inspired by pixelart: The upper right picture by exocet
has a nice background and remembered me about such shapes seen when playing
around with fractal landscape. Here we simply add a linear
gradient then decrease the number of colors with the range
function applied twice, because the result was looking better when reducing
to 6 colors just before reducing to 3 colors (!). You can see the result of
the small program on the right.
I also played a bit to create a full remix of exocet's artpiece, you can
see it on the bottom left, but the program is too long to copy here.
In the more_examples directory you'll also find a similar
background created with a circular gradient and another one using the
minimum/maximum functions.
  rem fractal landscape 256*512 in range [0;73]
  fab mknoise 0 255 32 64 frac.g
  fab sampleup_miller 3 frac.g frac.g
  fab range 0 73 frac.g frac.g

  rem heights made of vgradient in range [0;127]
  fab mknoise 0 0 256 512 grad.g
  fab vgradientfill 0 127 0 grad.g grad.g

  rem mix both and convert to 3 colors
  fab add frac.g grad.g both.g
  fab range 0 5 both.g both.g
  fab range 0 2 both.g both.g
  fab addI 1 both.g both.g
  fab scaledown 2 2 both.g both.g
  fab textpalette2rgb pal_Suburbs.txt both.g r.g g.g b.g
  fab rgb2bmp r.g g.g b.g TutorialSuburbs.bmp
del *.g | |
 > >
exocet-Suburbs
 |
|
<  |
The example below shows some results of the tiling command with
different tilesets. On the last three ones a vertical gradient was added
and they where dithered beforhand with the stucki method, so as
to have a more irregular result. Also an older, bugged, routine for
tiles in 1bpp can be seen in the old directory, and the result even
looks a bit better.

MOJO-ClintMauro |
>>> |

remixed with fab |
The power parameters in the star command are controlling the roundedness of
the "spikes". In order to see which ones are nice i wrote a small .c program that
gives the list of commands to draw stars with various roundedness.
The image shows a star with inner_power=50, outer_power=50 (note that powers are
multiplied by 100) on the bottom left, then the powers increase by steps of 50
horizontally (inner_power) or vertically (outer_power).
#include <stdio.h>
#include <stdlib.h>
int main() {
  int x,y,power1,power2;
  printf("fab mknoise 255 255 1024 1024 t.g\n");
  y=64;
  for(power2=50;power2<=400;power2+=50) {
    x=64;
    for(power1=50;power1<=400;power1+=50) {
      printf("fab star %d %d 5 0 32",x,y);
      printf("%d 64 %d 0 t.g t.g\n",power1,power2);
      x+=128;
    }
    y+=128;
  }
  printf("fab sampledown 2 2 t.g t.g\n");
  printf("fab grey2bmp t.g TutorialStars.bmp\n");
  printf("del *.g\n");
  exit(0);
} | |
 |
It's also possible to animate a star using the startangle parameter:
 See MkRotatingStar.bat in the more_examples directory.
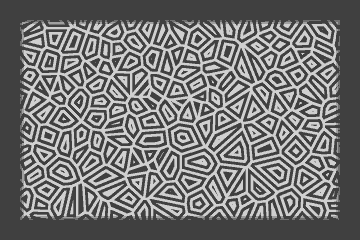
For the picture below i used MkNoise, allcolorsabove and subI
to have a limited amount of points randomly placed. Then i used the voronoi
command to make the Voronoi diagram of those points. Then the filter command
is applied to find the edges of the diagram, and i used many times the edge
function to create nice patterns. After the image is downsampled, reduced
to 4 colours, cropped, and darkened on the borders.
 |
|
  fab mknoise 0 3000 1200 840 t.g
  fab allcolorsabove 2999 t.g t.g
  fab subI t.g 2999 t.g
  fab voronoi 0 t.g t.g
  rem fab grey2bmp t.g Test_Voronoi.bmp
  fab filter -1 -1 -1 -1 8 -1 -1 -1 -1 1 0 t.g t.g
  fab allcolorsbelow 1 t.g t.g
  fab mulI 255 t.g t.g
  fab edge 4 0 255 t.g t.g
  fab edge 9 0 1 t.g t.g
  fab edge 9 0 255 t.g t.g
  [...]
  fab edge 9 0 1 t.g t.g
  fab edge 9 0 255 t.g t.g
  rem sampledown, reduce to 4 colors, darken the borders, etc
  [...]
  fab mulI 48 t.g t.g
  fab addI 64 t.g t.g
  fab grey2bmp t.g Test_Voronoi.bmp
  del *.g
|
The taglia effect is adapted from a BBC Basic program by Jan Vibe (he made a lot
of nice graphical effects on RiscOS).
You give the width and height of the picture, the size of the randomly walking ball and its border, then the
number of iterations (the higher the longer the path will be) and the output name.
I will try to make more variations on that one.
5. Future
The image below show some cool drawing techniques i would like to find an algorithm
for (edges for the first two, dithering for the others).

exocet-GPeur |
|

exocet-MrGland |
|

exocet-Dither |
|

Brian The Great-roflmao |
